Family activity: how to make string from nettles

Family activity: how to make string from nettles

Claire shows us how you can make your own string from the dried stems of stinging nettles. You could make a bracelet, use it to lash poles together for a shelter, or use it anywhere you need string!

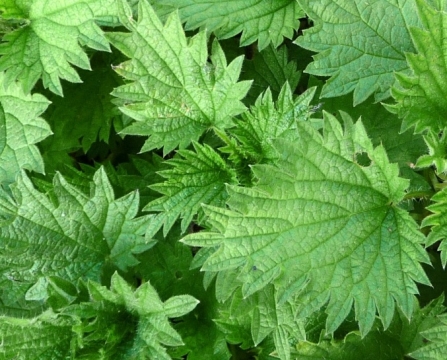
The tall, straight stems of stinging nettles have traditionally been used for making string or cord. Here’s how to make cord using natural materials you can collect yourself!

Nettles are very important plants for wildlife. Many butterflies such as the peacock and red admiral lay their eggs on them. Once hatched, the caterpillars feast on the nutritious nettle leaf. So make sure that you pick them sustainably and don’t take any more than you need.

Nettle string kit

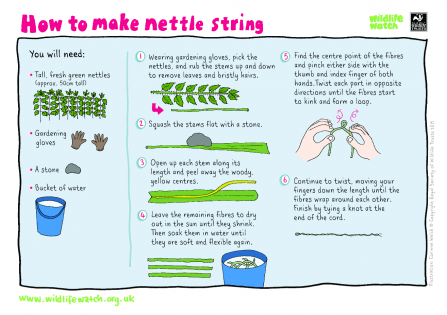
You will need

  • nettles (see below for how to collect them)
  • gloves – garden gloves or even washing up gloves would do!
  • scissors/secateurs
  • a log round, or something hard to bash your nettle stalks on
  • a mallet or heavy wooden stick for bashing nettle stalks
  • a small nail
  • a hammer

Get an adult to help you using tools and handling nettles!

Nettles by Harry Green

Step 1: find your nettles.
The ideal nettles for making cord are those that are about 1m tall and have a woody texture. These are perfect as they will have a brittle core which will separate more easily from the outer bark (younger nettles are harder to separate). Nettles are common and can be found in most habitats from wasteland to along the edges of forest tracks. Cut the nettle at the base with scissors or secateurs. Work from the outside of the nettle patch to avoid the stings.

Caution - Nettles have fine, hair-like structures called trichomes along their stems. These are designed to protect the plant from herbivorous animals by breaking off and injecting chemicals which irritate the skin. This often puts people off gathering them. You should wear gloves when handling nettles. 

Some people gather nettles without gloves, following the old advice to ‘grasp the nettle’. This literally means if you grab the nettle firmly enough, you crush the hairs and avoid being stung – but it doesn’t always work!

Removing leaves from stalk

Step 2: remove the leaves and stinging hairs.
Wearing gloves, hold the nettle at the base (root end), put your thumb completely around the nettle and grasp firmly but not too hard.  Draw the nettle along, using the crook of your thumb to strip off the leaves. This also removes the majority of the stinging hairs. If you haven’t already, cut off the root. If you are doing this at home, put the leaves in your compost, or you can dry the leaves to make a vitamin fuelled tea!

Extra activity - you could also have a magnifying glass to hand to look at the difference between a prepared stalk and one which still has all of its trichomes.

Step 3: split the stalk lengthways.
You will only need the outer fibres of the plant, so you will need to remove the woody inner pith, which forms the structure of the nettle and helps it to grow so tall, despite being so thin. 

Bashing stem on wooden log

a) Lay the nettle on a hard surface that can be used as an anvil such as a log round, then using a stout, short, thick length of wood or a mallet, gently bash the stalk along its length. This is to flatten it out and squash the tough nodes, where the leaves were, along the stem.

Separating fibres

b) Then using your thumbnail split the stem and slide your nail along its length to open it out.

Removing the pith

Step 4a: remove the inner pith.
Bend the whole stalk over your index finger about 5cm from the end. This will snap the woody inner material and allow you to begin peeling it away from the outer material. Throw away the woody inner pith. You will notice that the outer material is in sections, usually four.

Drying the fibres

Step 4b: separate into two sections and hang the stems somewhere to dry out. Drying helps to prevent your string from unravelling. Repeat the process for several nettles until you have enough material for the length of string that you want.

Making a loop to start the string

Step 5: start the twist (2-ply cordage).
Take a length of the dried fibres. Halfway along the fibres, pinch about 5cm apart and twist the fibres away from you with one hand while tensioning with the other. as you continue to twist, a loop will appear in the fibres, this will become the end of your string.   

Twisting string from a nail

Step 6: twist the string.
Hammer the small nail into your log round as an anchor point and place the loop over this. Twist the right hand fibres and cross over the left. Then repeat the process, twisting and crossing the strands as you go, you will quickly see the string forming. One nettle should make about 15cm of 2 ply string.

Lengthening with extra fibres

Step 7: lengthening your string.
You may wish to add material to the string to make it longer. You can do this by twisting in additional lengths of fibre. When you get to about 10cm from the end of a strip of fibres, lay a new length (thick end first) along the fibres that you have been working on and twist them together.

Knot the string to finish off

Step 8: knot and finish off.
When you have created your string to the length that you want it, finish off by tying the two strands into a simple knot. I would recommend you tie a couple of knots to make sure it doesn’t come apart.

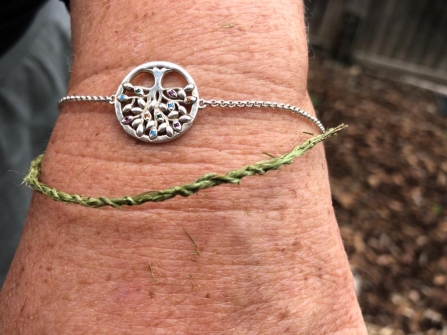
Nettle string bracelet

You can use your string to make a bracelet, a lanyard or make longer lengths to lash poles together for a shelter or anywhere where you might need some string!

Nettle string activity sheet

We'd love to see what you did with your nettle string!

Share a photo with us on Facebook

Get more family activities with our weekly wildlife email. 

Sign up today